


Hip pain relief, in clinical terms called hip pain rehabilitation, is the structured process of reducing joint and muscle discomfort through targeted movement, soft tissue work, and self-care techniques. A good hip pain relief tutorial does not start with passive stretching. It starts with understanding why your hip hurts and matching the right method to the right cause. Active mobility and stability training produce longer lasting relief than passive stretching alone. Most people can expect meaningful improvement within 4–8 weeks of consistent, diagnosis-matched practice.
What are the most effective exercises and stretches for hip pain?
Persistent hip pain is frequently linked to muscle weakness and poor movement control, not just tightness. That distinction matters. If you only stretch a weak hip, you get temporary relief. You need to activate and strengthen the muscles that protect the joint.
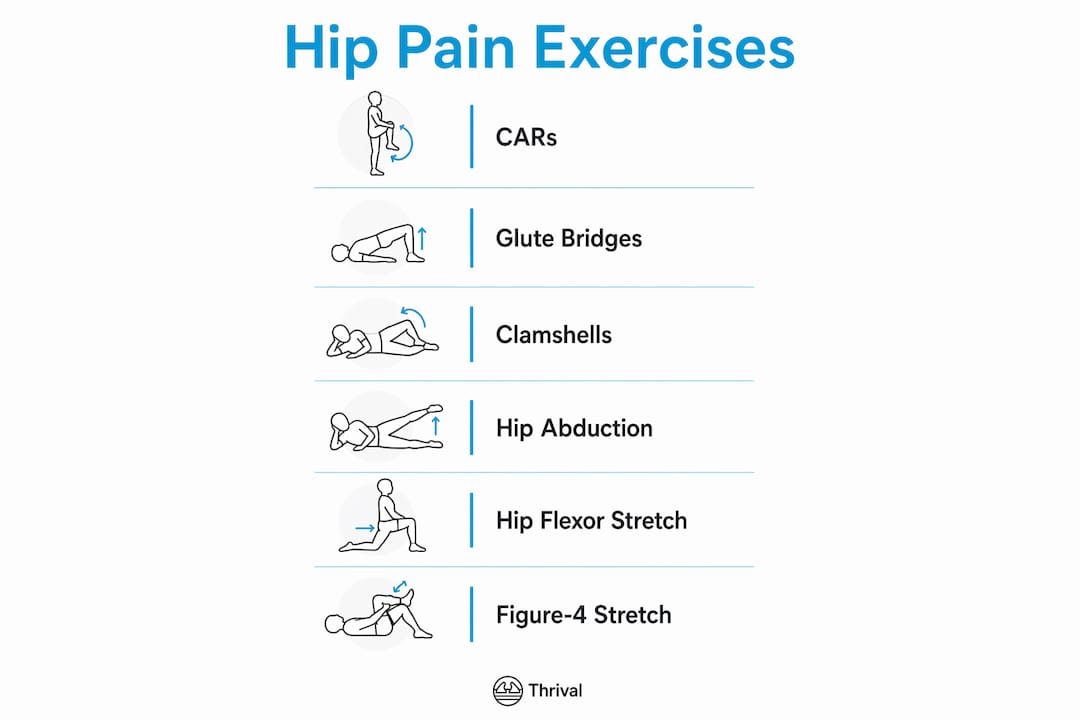
1. Controlled Articular Rotations (CARs)
CARs are the foundation of active hip mobility work. You move the hip through its full range of motion under muscular tension, which trains the joint and the nervous system at the same time. Lie on your back or stand holding a wall. Slowly draw the largest circle possible with your knee, keeping your core braced. Do 3–5 repetitions each direction per side. Targeted daily CARs can produce meaningful pain reduction in 1–2 weeks.
2. Glute bridges
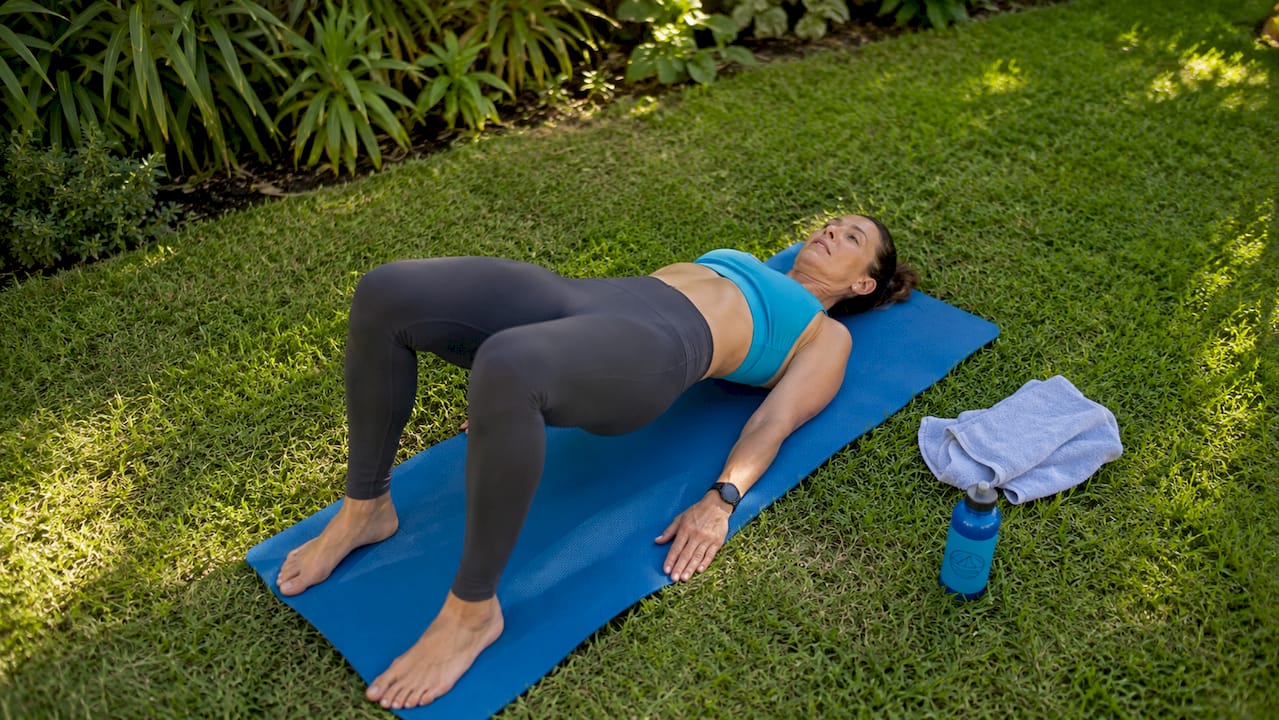
Glute bridges directly strengthen the gluteus maximus, the primary stabilizer of the hip joint. Lie on your back with knees bent and feet flat. Press through your heels and lift your hips until your body forms a straight line from knees to shoulders. Hold 2 seconds at the top, then lower slowly. Aim for 3 sets of 10–15 repetitions.
3. Clamshells
Clamshells target the gluteus medius, the muscle most often weak in people with hip pain. Lie on your side with hips stacked and knees bent at 45 degrees. Keep your feet together and rotate your top knee toward the ceiling. Lower with control. Perform 3 sets of 12–15 repetitions per side. A resistance band around the thighs increases the challenge once bodyweight feels easy.
4. Standing hip abduction
Stand next to a wall for balance. Lift one leg directly out to the side, keeping your pelvis level. Do not lean. Lower slowly. This exercise reinforces the lateral hip stability that clamshells begin to build. Three sets of 12 repetitions per side is a solid starting point.
5. Hip flexor stretch
Kneel on one knee in a lunge position. Shift your hips forward until you feel a stretch in the front of the rear hip. Hold 30–45 seconds. The psoas hip flexor stretch is especially useful for people who sit for long periods, since prolonged sitting shortens the hip flexors and pulls the pelvis out of alignment.
6. Figure-4 stretch
Lie on your back. Cross one ankle over the opposite knee and gently pull both legs toward your chest. This targets the piriformis and external rotators. Hold 30–45 seconds per side.
Pro Tip: Never push through sharp or stabbing pain during any of these exercises. A mild ache or stretch sensation is normal. Sharp pain is a signal to stop, reduce range of motion, and reassess.
Effective hip pain rehabilitation prioritizes slow, steady, pain-free repetitions to retrain stabilizing muscles. Speed and load come later. Control comes first.
How to safely use cold and heat therapy for managing hip pain
Cold and heat therapy are two of the simplest hip pain management techniques available, but most people use them at the wrong time. The rule is straightforward: cold for acute pain and swelling, heat for stiffness and chronic ache.
When to use ice:
- Apply ice or a cold compress within the first 48–72 hours of a new injury or flare-up.
- Use for 10–15 minutes every 2–3 hours during the first 1–3 days.
- Always wrap the ice pack in a thin cloth to protect the skin.
- Do not apply ice directly to bare skin for more than 10 minutes at a time.
When to use heat:
- Switch to heat after the acute phase passes, typically after 72 hours.
- A heating pad or warm towel applied for 15–20 minutes relaxes tight muscles and improves blood flow.
- Heat works well before exercise to loosen stiff tissue.
- Do not use heat on a swollen or inflamed joint. It will increase inflammation.
Pro Tip: Contrast therapy, alternating 10 minutes of cold with 10 minutes of heat, can help reduce stiffness in chronic hip conditions. Start and end with cold if swelling is present.
Ice wraps with compression sleeves and electric heating pads with adjustable temperature settings are the most practical tools for home use. Both are widely available and inexpensive.
How to structure a hip pain relief routine for best results
A consistent routine produces better results than occasional intense sessions. Home hip relief routines work best with 3–4 exercises per session, performed up to 3 times daily, starting with a 3–5 minute warm-up.
Here is a simple session structure you can follow:
- Warm-up (3–5 minutes). Walk slowly, march in place, or do gentle hip circles. The goal is to increase blood flow to the joint before loading it.
- Active mobility (5 minutes). Perform CARs for 3–5 repetitions each direction. This primes the joint and nervous system.
- Strengthening (10–15 minutes). Choose 2–3 exercises from the list above, such as glute bridges, clamshells, and standing hip abduction. Keep repetitions slow and controlled.
- Stretching and cool-down (5–10 minutes). Finish with the hip flexor stretch and figure-4 stretch. Hold each position for 30–45 seconds.
Tracking your symptoms matters as much as doing the exercises. Rate your pain on a simple 0–10 scale before and after each session. If your pain consistently rises after a session, reduce the number of repetitions or the range of motion. Movement thresholds are critical. Finding the range where circulation and mobility improve without triggering a flare-up is the core skill of effective self-care.
Personalized exercise plans that address your specific diagnosis are more effective than generic exercise lists. If your pain does not improve after 4–6 weeks of consistent practice, a physical therapist can assess your movement patterns and adjust your program. Most people see meaningful pain reduction within 4–8 weeks of a structured program. Consistency matters more than intensity.
Staying motivated is easier when you tie your routine to an existing habit. Do your morning exercises before coffee, or your evening stretches after dinner. Small anchors build lasting habits.
Common pitfalls when doing at-home hip pain exercises
Most people who fail to get relief from home exercises are not doing the wrong exercises. They are doing the right exercises incorrectly or inconsistently.
“Hip pain is often a coordination issue. Successful recovery retrains muscle timing and controlled movement, not just raw strength.” — SF Hips Physical Therapy
Watch for these common mistakes:
- Moving too fast. Rapid repetitions bypass the stabilizing muscles you are trying to activate. Slow down to 3–4 seconds per movement phase.
- Skipping the warm-up. Cold muscles and joints are less responsive and more prone to irritation. The 3–5 minute warm-up is not optional.
- Exercising through sharp pain. A dull ache is acceptable. Sharp, stabbing, or worsening pain means you are exceeding your safe movement threshold.
- Neglecting rest days. Muscles need recovery time to adapt. Three to four sessions per week is enough for most people starting out.
- Doing too much too soon. Complete rest is counterproductive, but so is overloading a painful joint. Modified movement beats both extremes.
Seek professional help if you experience any of the following: pain that radiates down the leg, sudden severe pain after a fall, inability to bear weight, or pain that does not respond to 6–8 weeks of consistent self-care. These signs suggest a condition that requires clinical assessment, not just a better exercise routine.
If a specific exercise consistently causes pain, modify it before abandoning it. Reduce the range of motion, remove resistance, or switch to a supported version. For example, if standing hip abduction causes pain, try the same movement lying on your side first. Learn more about why hip mobility matters for long-term function and pain prevention.
Key takeaways
Consistent, targeted movement is the most effective approach to hip pain relief, combining active mobility, strengthening, and smart self-care to produce lasting results.
| Point | Details |
|---|---|
| Active mobility beats passive stretching | CARs and stability exercises retrain the joint and nervous system for lasting relief. |
| Cold and heat have distinct roles | Use ice for acute flare-ups in the first 48–72 hours; switch to heat for chronic stiffness. |
| Routine structure drives results | A 3–5 minute warm-up, strengthening, and cool-down performed consistently outperforms random exercise. |
| Symptom tracking prevents setbacks | Rate pain before and after each session and reduce load if pain rises consistently. |
| Sharp pain is a stop signal | Mild ache is normal; sharp or worsening pain means you need to modify or seek professional help. |
Movement over everything: what I’ve learned about hip pain
Most people come to hip pain exercises looking for a stretch that fixes everything. I understand the appeal. Stretching feels productive and it is easy to do. But after working with recovery tools and movement-based approaches for years, the pattern is clear: passive stretching alone rarely solves hip pain that has been around for more than a few weeks.
The real shift happens when you start treating movement as medicine. CARs changed how I think about joint health entirely. The idea that you can train the nervous system to control a joint, not just loosen the surrounding tissue, is genuinely useful. It means you are building something durable, not just managing symptoms.
Patience is the part nobody wants to hear. The 4–8 week timeline for meaningful improvement is real. The people who get there are the ones who do the work consistently at a manageable intensity, not the ones who push hardest in week one and then stop because they flared up. If you feel like your hips are slowing you down, the answer is almost always more controlled movement, not less.
Quality beats quantity every time. Ten slow, controlled glute bridges do more than thirty rushed ones. That principle applies to every exercise in this tutorial. Slow down, feel the muscle working, and build from there.
— Cameron
How Thrival supports your hip pain recovery

Exercises and stretches build the foundation. The right recovery tool helps you get more out of every session. The Thrival Deep Tissue Pro is a US-made, non-motorized deep tissue recovery system with interchangeable attachments, including the Bullseye and Ballhead, designed to target tight spots in the hip flexors, glutes, and surrounding muscle groups. It delivers targeted muscle release that complements the strengthening and mobility work in this tutorial. Thrival products come with a lifetime warranty, free shipping, and FDA registration. If hip flexor tension is your primary issue, explore the Adjustable Psoas Release Tool to add targeted release work to your routine.
FAQ
How long does it take to get hip pain relief from exercises?
Most people see meaningful pain reduction within 4–8 weeks of consistent, structured exercise. Progress is faster when exercises are matched to the specific cause of your hip pain.
What is the best stretch for hip pain?
The figure-4 stretch and the hip flexor stretch are the most effective for most people. The figure-4 targets the piriformis and external rotators, while the hip flexor stretch addresses tightness from prolonged sitting.
Should I use ice or heat for hip pain?
Use ice for the first 48–72 hours after an acute injury or flare-up, applying it for 10–15 minutes every 2–3 hours. Switch to heat after the acute phase to relax stiff muscles and improve circulation.
Can I exercise if my hip hurts?
Yes, with modification. Modified movement is superior to complete rest for most hip conditions. Reduce range of motion and load, and stop if you feel sharp or worsening pain.
When should I see a doctor for hip pain?
See a doctor if pain radiates down the leg, follows a fall, prevents weight-bearing, or does not improve after 6–8 weeks of consistent self-care. These signs require clinical evaluation beyond a home exercise program.